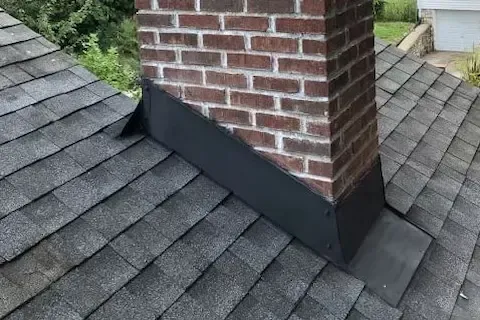
Chimney Flashing Repair in Woodbury MN: Full Guide
Chimney flashing failure represents one of the most persistent roofing problems in Woodbury, Minnesota. The combination of freeze-thaw cycles, ice dam formation, and seasonal temperature swings creates constant stress on the metal barriers protecting your roof-to-chimney connection. Understanding how to identify, repair, and prevent flashing failures can save you thousands in water damage restoration costs.
Understanding Chimney Flashing Components
Chimney flashing consists of multiple interconnected components working together to redirect water away from the roof penetration. Step flashing runs along the sides of your chimney, with individual L-shaped pieces layered beneath each shingle course. Counter flashing, also called cap flashing, covers the step flashing and gets embedded into the chimney mortar joints.
The back side of your chimney requires either a cricket or saddle - a peaked structure that diverts water around the chimney base. Without proper cricket installation, water pools behind the chimney during heavy rains and snowmelt. Base flashing at the front of the chimney completes the water management system.
Professional roofers use different materials for flashing installation. Galvanized steel offers durability at a moderate cost but requires replacement every 15-20 years. Aluminum provides corrosion resistance and easier workability. Copper flashing lasts 50+ years but costs significantly more upfront. Lead-coated copper combines longevity with superior weather sealing properties.
Proper flashing installation requires precise measurements and careful integration with your existing roofing materials. Each piece must overlap correctly, maintain proper slopes for drainage, and seal completely against both the roof deck and chimney structure. Understanding these components helps you evaluate repair quotes and identify substandard work.
Common Flashing Failure Patterns in Washington County
Minnesota's climate creates specific failure patterns that experienced contractors recognize immediately. Ice dam formation puts tremendous pressure on flashing seams, often separating counter flashing from chimney mortar joints. When ice builds up behind the chimney, it forces water under shingles and through compromised flashing connections.
Thermal expansion and contraction cycles cause metal fatigue over time. You'll notice this as small cracks along fold lines or separation between different flashing components. These hairline cracks become major leak sources during spring thaw periods when water volume overwhelms the damaged barriers.
Wind-driven rain exploits even minor flashing defects. The horizontal rain common during severe thunderstorms pushes water up under shingles and into gaps that would normally shed vertical precipitation. Your Chimney and Flashing Repair needs become apparent during these weather events when ceiling stains or basement dampness suddenly appear.
Deteriorated chimney mortar joints allow counter flashing to pull loose. Once the top edge of your flashing loses its seal, water runs directly down the chimney sides and into your home's structure. This pattern often develops gradually, making it difficult to detect until significant damage occurs.
Inadequate original installation creates premature failure regardless of material quality. Flashing pieces installed without proper overlap, insufficient slope, or poor integration with roofing materials will fail within a few years. Recognizing these installation defects helps prevent recurring problems.
DIY Assessment and Professional Repair Decisions
Start your assessment from inside your home during or immediately after heavy rain. Look for water stains on ceilings, walls, or in the attic space around your chimney. Fresh stains indicate active leaks, while old discoloration suggests previous problems that may have been temporarily sealed.
External inspection requires careful attention to safety protocols. Use binoculars to examine flashing from ground level before attempting roof access. Look for obvious separation between flashing and chimney, rust stains, or missing pieces. Bent or warped flashing indicates impact damage or ice dam pressure.
Check counter flashing integration with chimney mortar joints. Loose or missing caulk along these seams allows water penetration. However, over-caulking often indicates attempts to mask more serious structural problems. Professional assessment becomes necessary when multiple components show damage or when leak sources remain unclear.
Temporary repairs using roofing cement or caulk may stop immediate leaks but rarely provide long-term solutions. These quick fixes often trap moisture and accelerate deterioration of surrounding materials. Understanding when temporary measures are appropriate versus when complete replacement is necessary protects your investment.
Professional repair decisions depend on the extent of damage and the age of existing components. Partial repairs work when only one or two pieces need replacement and the remaining flashing shows good condition. Complete replacement becomes cost-effective when multiple components have failed or when the existing installation was done incorrectly.
Professional Installation and Repair Process
Professional chimney flashing repair begins with complete removal of damaged components and inspection of underlying roof deck. Experienced contractors check for rot, water damage, or structural problems that must be addressed before new flashing installation. This inspection phase prevents future problems and ensures warranty coverage.
Proper step flashing installation requires integration with your existing shingle pattern. Each L-shaped piece gets positioned under the shingle course above and over the course below. The vertical leg extends up the chimney side while the horizontal leg lies flat against the roof deck under the shingles.
Counter flashing installation involves cutting reglets into chimney mortar joints or utilizing existing grooves. The flashing gets embedded into the joint and sealed with appropriate compounds. Professional installers avoid over-penetrating the chimney structure while ensuring adequate depth for weather resistance.
Cricket installation requires precise measurements and custom fabrication for your specific chimney dimensions. The peaked structure must provide adequate height to direct water flow while integrating seamlessly with surrounding roofing materials. Proper cricket installation prevents the water pooling that causes most back-side chimney leaks.
Quality installation includes thorough testing procedures. Professionals use water testing to verify seal integrity before completing the project. This testing phase identifies potential problems while materials and labor remain under warranty coverage.
Material Selection and Longevity Factors
Material selection significantly impacts repair longevity and maintenance requirements. Galvanized steel provides adequate performance for most Woodbury homes but requires periodic inspection and maintenance. The coating eventually wears through, leading to rust formation and eventual replacement needs.
Aluminum flashing offers superior corrosion resistance and easier workability for custom applications. The lighter weight reduces stress on chimney structures, while the material's flexibility accommodates thermal movement better than heavier alternatives. However, aluminum requires careful handling during installation to prevent damage.
Copper flashing represents the premium choice for longevity and appearance. The material develops a protective patina over time and can last 50+ years with minimal maintenance. Initial costs run higher, but the extended lifespan often justifies the investment for homeowners planning long-term occupancy.
Lead-coated copper combines copper's longevity with enhanced sealing properties. The lead coating provides superior conformability around complex chimney shapes while maintaining copper's corrosion resistance. This material works particularly well for historic home restoration projects.
Synthetic flashing materials offer alternatives for specific applications. Modified bitumen products provide excellent sealing properties but limited longevity. EPDM rubber flashing works well for certain repair situations but requires different installation techniques than traditional metal products.
Seasonal Maintenance and Prevention Strategies
Spring inspection following ice dam season reveals winter damage and allows early intervention before minor problems become major repairs. Look for separated flashing seams, bent components, or new gaps around chimney connections. Addressing these issues promptly prevents water intrusion during spring rains.
Fall preparation involves clearing debris from flashing areas and checking counter flashing seals. Leaves and debris can dam water against flashing seams, creating pressure that forces water through small openings. Your roof ventilation guide provides additional information about maintaining proper attic airflow that reduces ice dam formation.
Gutter maintenance directly impacts flashing longevity. Clogged gutters cause water backup that can reach flashing levels, particularly during heavy rains or rapid snowmelt. Regular gutter cleaning and proper downspout drainage protect your flashing investment.
Ice dam prevention strategies reduce stress on flashing components. Adequate attic insulation and ventilation prevent the temperature differentials that create ice dams. Professional energy audits can identify specific improvements that protect both your flashing and overall roof system.
Professional inspection schedules depend on your roof's age and previous repair history. Newer installations may only require inspection every 3-5 years, while older systems benefit from annual professional assessment. Documenting inspection results helps track deterioration patterns and plan replacement timing.
Local Building Codes and Permit Requirements
Woodbury building codes specify minimum standards for chimney flashing installation and repair. Major repair projects typically require permits, while minor maintenance may not. Understanding these requirements prevents compliance issues and ensures proper inspection of completed work.
Washington County permits help ensure proper installation techniques and material standards. The permit process includes plan review and inspection phases that catch potential problems before they become expensive failures. Working with licensed contractors familiar with local requirements streamlines the permit process.
Insurance considerations often depend on proper permitting and professional installation. Many policies require permitted work for coverage of related damage claims. Documenting proper installation through the permit process protects your insurance coverage and property value.
HOA requirements in many Woodbury neighborhoods specify material and appearance standards for roofing repairs. Review these requirements before starting flashing repair projects to avoid compliance issues. Some associations require architectural review for visible changes to roof components.
Cost Factors and Contractor Selection
Chimney flashing repair costs vary significantly based on access difficulty, material choices, and extent of damage. Simple step flashing replacement might cost $500-800, while complete flashing system replacement with cricket installation can reach $2,000-4,000. Getting detailed estimates helps budget appropriately for your specific situation.
Contractor selection significantly impacts both cost and quality outcomes. Licensed roofing contractors with chimney experience provide warranties and insurance coverage that protect your investment. Verify licensing, insurance coverage, and local references before committing to any contractor.
Material costs represent only a portion of total project expense. Labor costs reflect the complexity and safety requirements of chimney work. Experienced contractors work more efficiently and provide better results than general handymen attempting specialized roofing work.
Timing considerations affect both cost and contractor availability. Spring and fall represent peak seasons when prices may be higher and scheduling more difficult. Winter repairs command premium pricing but may be necessary for active leaks. Planning non-emergency repairs during off-peak periods can provide cost savings.
Warranty coverage varies significantly between contractors and material choices. Professional installation typically includes workmanship warranties of 2-5 years, while material warranties depend on the specific products used. Understanding warranty terms helps evaluate contractor proposals and long-term value.
